How to Tattoo
There is a lot of information you need to learn when learning how to tattoo. You will need to understand how to sanitize your equipment and workplace to keep your clients and yourself healthy, you will need to have a complete understanding of how your tattoo machine works and how to set it up, you will need to know about all of the various types of needles and how to they apply to the type of tattoo you are doing, how to properly transfer a stencil, and how to properly bandage a tattoo before you send a client of their way; not to mention you will need to learn the process of tattooing!
This how to tattoo guide is loaded with videos, techniques and tips. Plus, step by step guides on EVERYTHING to get you started practicing.
This complete how to tattoo guide will teach you everything you need to know, and much much more!
I think this goes without saying, but these lessons are not meant to replace the knowledge you receive from hands-on training through a tattoo apprenticeship. It is highly recommended that you learn this material to use as a foundation for your apprenticeship, and not as a means for teaching yourself how to tattoo.
And if you do have no intention of going through an apprenticeship, then thoroughly study this information and practice on inanimate objects many times before ever putting needle to skin. Your knowledge of sanitation and the tattoo process will be what protect your clients and yourself from mutilated limbs or life-threatening diseases.
“This is a HUGE guide on how to tattoo, so here’s a table of contents so you can come back and pick up reading where you left off!”
Proper Sanitation

Knowing how to properly sanitize your equipment and your work area is the single most important thing when it comes to being a competent tattoo artist.
To understand why sanitization is such a concern you have to first understand what is occurring while tattooing. During the tattoo process, the artist is essentially creating an open wound with direct contact to blood. Anytime you are dealing with blood you run the risk of transferring blood borne diseases.
Whether you’re working in a tattoo shop as an artist or tattooing from your couch, anybody who has any intention of tattooing needs to be certified by the American Red Cross in blood borne pathogens and CPR. Not only for your safety but for the safety of your clients and their families as well.
The most common blood-borne diseases as stated by the CDC (Center for Disease Control) are:
Common Blood- Borne Pathogens
- Hepatitis B (HBC)
- Hepatitis C (HCV)
- Human Immunodeficiency Virus (HIV)
These are all very life altering/life threatening diseases that should not be taken lightly by any tattoo artists. The best way to prevent spreading these diseases is to create a safety culture. Make safety your priority and a habit that comes naturally; your clients will thank you!
Reusable Equipment
Not all of your equipment is going to be disposable, and just because the piece of equipment isn’t actually making contact with the skin, it is coming into contact with bodily fluids. So it should be sterilized as such.
Types of Reusable Equipment
Common
- Tubes
- Tips
- Grips
Uncommon
- Needle Bars
If you choose to use reusable equipment, you will need to go about cleaning it the correct way. The acceptable level of cleanliness is 100%, so chemical sanitation alone is not going to do the job that is required; you’re going to need to use an autoclave to clean your gear properly.
An autoclave is a strong, heated container used for chemical reactions and other processes using high pressures and temperatures.
If you don’t have access to an autoclave you need to only use disposable equipment.
How to use an autoclave
- Clean all equipment with chemical solutions
- Place cleaned equipment in autoclave
- Make sure it is running at manufacturer’s specified temperature and pressure
- Leave equipment in autoclave for 20 minutes AFTER it reaches desired temperature
The autoclave must be tested regularly. There are heat test that test to see if the machine is getting hot enough to kill all of the microorganisms. Then there is the preferred method, which is to run a spore test through a local lab.
You should keep a detailed log about your autoclave use, and not use the equipment cleaned by an autoclave until after it has been spore tested!
Disposable Equipment
The best practice is to use disposable equipment as much as possible. This is the best method available to prevent the spread of blood-borne diseases through equipment—simply put, you’re taking a lot of the risk out of the equation.
Common Pieces of Disposable Equipment
- Needles
- Needle Bars
- Tips
- Grips
- Ink
*The Parts of the Machine are explained in a later section of the guide*
Disposable ink is not something you see every day, but it is a highly recommended way of tattooing. Once you sterilize and ready the work area for a tattoo you typically fill disposable caps with the amount of ink you feel your will need. However, if you end up needing more, you will need to put on a new pair of gloves and re-sanitize the work area before you can fill up a new cup of ink. This is to prevent any cross contamination with the ink and bodily fluids. This whole process can be a bit of a hassle, and is often times not done in the correct manner. That’s why it’s best to use disposable prepackaged inks. With disposable ink, you simply change your gloves and grab a new shot out of the box.
Cleaning Your Work Area
Your equipment is not the only things that run the risk of carrying blood-borne pathogens, you also need to make sure to keep your entire work area as clean as possible. This includes things like any tables, chairs, or counters, the floors, and your tattoo machine as well. Anything that has the potential to be contaminated with bodily fluids should be thoroughly cleaned before and after each and every tattoo. Also, you should never tattoo over carpet or porous floors, bodily fluids will be trapped and hard to clean.
Even with these precautions, it’s best to still bag everything you can. Bag your machine and all of its chords, bag your spray and ink bottles. It’s also wise to wrap your furniture is plastic while doing a tattoo.
Make sure you keep your biohazard material and your regular trash separated. Anything thing that comes into contact with bodily fluid needs to be disposed of and labeled properly.
Protecting Yourself
I think this goes without saying, but just as you want to take every necessary precaution to protect your clients, you should take every precaution necessary to protect yourself. You should always wear clean disposable tattoo gloves, safety glasses, disposable face shield, and a gown or disposable plastic cover for your arms, torso, and other exposed body parts.
This may all sound tedious and absurd, but these are life threatening diseases we are talking about here. You’ll rather be over cautious than have your or your clients lives be ruined.
Preventing Cross Contamination
The easiest way to prevent cross contamination is by keeping things separate and maintaining the separations integrity. This is no different than how you prevent cross-contamination in the kitchen. You keep the raw meat separate from your cooked food and clean plates right?
You need to keep anything contaminated with bodily fluids separate from your sterile area and the area where you keep supplies you will need while you are tattooing. If you abide by the rules of separation the risk of cross contaminating equipment like ink bottles and sterile gloves with bodily fluids is dramatically diminished.
Sterile Area – The area that contains all of your sterile equipment. This area is not to be touched PERIOD during the entire tattoo process. That means from the second you start, until you completely bandage the tattoo! This includes your ink bottles.
Supplies Area – The area where you keep the sterilized supplies you need during the tattoo process. This area can be touched with clean gloves.
Contaminated Area– The tattoo machine and any area that may be contaminated by bodily fluids, that includes the client themselves. The contaminated area remains contaminated until everything is bandaged and sterilized: Your client, yourself, and your work area.
Setting Up Your Machine

Knowing Your Machine
Knowing at least the general information about your machine’s part will really help you once you start fine tuning your tattoo machine to how you like or what you need it to do.
Coil Tattoo Machine Parts
- Frame – The frame can be thought of as what holds everything together. There two styles available: traditional and cutback. Traditional is just how it sounds it is the common style where contact screw is towards the front of the machine. Whereas with a cutback frame, the contact screw is moved towards the rear of the machine. Tattoo artists put a small front spring on a cutback frame to increase the speed of their machines
- Coils – The coils are the cylinders resting in the middle of your frame of your tattoo machine. The number of coils of your machine can vary from between 1-3. Typically the most common style of coil tattoo machine you will see is going to have 2 coils. Electricity flows through the coils creating electromagnetic energy that draws the armature towards it, which ultimately forces the needle into the skin.
- Front springs – The front springs are used to give the machine it’s fluid motion. The front springs are attached to the armature bar near the front of the machine and are the what first comes into contact with the contact screw. The front spring plays a major role in breaking and reestablishing the electromagnetic field.
- Rear springs – The rear springs are attached to the rear of the frame, and are used to store the energy of the armature bars movement.
- Armature bars – The armature bar is what attaches the needle to the machine. The armature bar is also a huge part of the electromagnetic system that allows the machine to operate. The magnetized coils draw the armature bar down which starts the process of breaking the electromagnetic field.
- O-rings – The O-ring is not a necessary component of the tattoo machine, but basically, it is a rubber band of sorts that wraps around the front spring. Some artists use these as a way of making the machine quieter while others believe that it helps in moving energy created by the front spring hitting the contact screw.
- Contact points/Contact Screw – The contact points where the energy that flows through the tattoo machine ultimately ends up. When the front spring comes in contact with the contact screw it closes the circuit, releasing the electromagnetic field, causing the magnet to kick on and pull the armature bar down, which opens the circuit, which turns the magnet off, and then the front spring kicks in starting the process over again. The standard is to have you contact point at 90° where it meets the front spring, but you can tune your machine however you’d like by adjusting the angle of the contact point. Contact points can be made with silver, copper, or brass.
Assembling a Coil Tattoo Machine
What you will need to assemble a complete coil machine:
- Machine – The machine can be thought of as everything attached to the frame: the frame, coils, front spring, rear spring, armature bar, and contact points. Typically when you buy a machine it will come with all of these parts pre-assembled, although, you can purchase and switch out individual parts to personalize the machine and set it up how you need i.e. to speed it up or make it hit harder.
- Grip – The grip where you hold on to the machine. It also stores the tube stem and tip.
- Tube Stem – It’s a metal tube that connects your grip to the frame.
- Tube Tip – The tube tip is what stores the ink while you are tattooing. It is connected to the bottom end of the grip.
- Grommet – The grommet is a rubber fastener that holds the needle bar to the armature bar.
- Needle Bar – The needle bar is what connects the needles to your armature bar with the help of the grommet.
- Needle Group – If you buy premade needles they will come with the needles already soldered to the needle bar. They come in various different styles; generally more needles are grouped together at the base of the needle bar to do shading, while less needles will be grouped together for lining.
- Allen Wrench – most parts on a tattoo machine require an Allen wrench to tighten down or adjust.
If your machine comes completely disassembled it’s a simple process to put a simple set up together.
- Most machines will come with the coils, armature bar, and springs intact.
- Attach the tube tip to one end of the grip and tighten it down with an Allen wrench.
- Attach the tube stem to the other end of the grip and tighten it down with an Allen wrench.
- On the front end of your frame, there should be a twisting fastener, loosen it, and place the tube stem end of the grip into it. You will adjust its position based on what you are trying to do (You use this to adjust the needle depth), then tighten it down hand tight.
- Place the grommet on the end of the armature bar nipple.
- Carefully slide the needle bar with the attached needle grouping down and through the tube stem, and out of the bottom of the tube tip, place the loop on the end of the needle bar firmly over the grommet.
That’s all there is to assemble a basic set up for your coil tattoo machine. Now, there are endless ways to tune your machine to do the specific things you need, and we will get into those in just a bit.
Assembling a Rotary Tattoo Machine
Rotary machines share a few similarities with the coil tattoo machine, but the differences are very dramatic. Instead of utilizing an electromagnetic field to pull the armature bar down with the needle attached to it, rotary machines use a DC motor to move the needle. The needle is attached to the motor through what’s called the cam. These cams can come in various sizes and are used as a way to tune the machine. The assembly is the same as the coil machine, but instead of attaching the needle bar to the armature bar you attach it to the cam.
The plus side to rotary machines is this simple setup is basically all you will need. Most rotary tattoo machines are made for both shading and lining while coil machines have to be set up for one or the other. You can add a bigger cam to slow a machine down or a smaller to speed them up if you wanted to, but to switch from a liner to a shader you just swap out for the correct needle grouping and adjust the needle depth with the tube stem! It’s that simple!
Machine Tuning
Why You Need to Tune a Tattoo Machine
Machine tuning refers to how you need to set up a machine to run a specific way. What I mean by this is you will need to set up a machine different if you are going to need the machine for a liner than if you are going to be using the machine as a shader. And even then there are all kinds of different ways to tune the machine for more subtle things like to use for a softer gradient and so on and so forth.
There isn’t any wrong way to set up a tattoo machine. It all depends on the artist that is going to be using the machine. It’s best to play around with different setups (on practice skins never play around on someone’s real skin!) to see how you like the machine set up for specific actions. Once you find the way you like your liners set up or your shaders set up etc., you need to document it and commit it to memory. One of the best assets you can develop as a tattoo artist is consistency. The best way to achieve consistent work—outside of your focus—is having your machines set up how you need them.
Machine tuning is something you are going to have to develop on your own as an artist. What I will teach you here is the basics required to develop machine tuning techniques unique to your own artistic abilities and tastes.
A few of the of the basic principles you need to know to tune a tattoo machine are:
- Spring gauges – The gauge of the spring refers to the thickness of the metal. Basically, thicker gauged springs will make your machine hit harder while thinner springs will make it hit softer. This is not the end all be all, you also need to take into consideration the length of the spring. Generally, a longer spring won’t hit as hard as a shorter spring will.
- Contact point placement – If you have a cutback frame—meaning you can adjust the placement of the contact point (not the angle)—moving the contact point toward the rear of the machine will speed the machine up.
- Voltage – When tuning a machine the voltage is an important factor you need to pay attention to. Different machines will run differently with the voltage you use. Make sure to keep in mind what voltage works best for what setup and what you are trying to get out of the machine.
- The 90° rule – The standard is to have you contact point at 90° where it meets the front spring, but you can tune your machine however you’d like by adjusting the angle of the contact point.
To get you started on the right path I will go over how you can tune a few basic setups on a coil tattoo machine, as well as, how to slow up or speed a machine down, adjust your needle depth how you need it, and also how to tune a rotary tattoo machine.
A good rule of thumb: Place your thumb over the nipple of the armature bar and press the armature bar down until it is touching the front coil. You’re going to be measuring the distance between the front spring and the tip of the contact screw. For a liner, you need this distance to be the width of a dime and the width of a nickel for a shader.
How To Set Up A Liner
The idea behind a liner is to hit hard and fast.
- Check the gap between the front spring and the contact point while you have the armature bar pressed down.
- Either tighten or loosen the screw until the gap is the width of a dime.
- Adjust your needle depth to where the needle is sticking out a dime’s width from the tip. You adjust this by moving the tube stem up or down and hand tightening it to the frame.
- Place a rubberband around the coils and needle. Not tight enough to slow the needle down, but to hold it firmly in place.
- Adjust the voltage to what the machine runs best at. Generally, a higher voltage will make your machine run faster, but you will have to play around with it till it works how you need it.
These are not hard fast rules to live by, just a general basic setup that you should expand upon as you grow as a tattoo artist.
There are better ways to control your speed and how hard a machine hits than with the nickel and dime gap rule. For instance, to get a good liner set up you will want to have softer and shorter springs and a lighter armature bar. Both will help speed up your machine more than the basic nickel and dime gap rule.
How to set up a Shader
Your shader is going to be used for gradients and for blending. Traditionally your shader is going to have a longer stroke and run slower than your liner.
- Check the gap between the front spring and the contact point while you have the armature bar pressed down.
- Either tighten or loosen the screw until the gap is the width of a nickel.
- Adjust your needle depth to where the needle is sticking out a nickel’s width from the tip. You adjust this by moving the tube stem up or down and hand tightening it to the frame.
- Place a rubberband around the coils and needle. Not tight enough to slow the needle down, but to hold it firmly in place.
- Adjust the voltage to what the machine runs best at.
Again, there are better ways to control your speed and how hard a machine hits than with the nickel and dime gap rule. For a shader, you should use longer stiffersprings, and a heavier armature bar.
With a shader the speed and how hard you need it to hit will vary depending on the job. Your set up for shading gradients and blending will be very different from when you need it to pack in color. The important thing is that you know exactly how to speed a machine up when you need it, and slow one down when you need it. Then you will be able to really develop your own personal way to tune machines to the exact way that best suits you.
Speed up a Machine
To develop your own style of tuning, you need to know how to speed up the machine, and you want to be able to do it without having to turn up the voltage to get the speed you need. A few things you can do to speed your machine up, aside from using the dime gap rule are:
- You can use a cut back frame
- Use a lighter armature bar
- Hard front springs and softer back springs
Slow Down a Machine
To develop your color packers and shaders, you’re going to want to know how to slow a machine down. The easiest way is to use the nickel gap rule, and others are:
- Use a heavier armature bar
- Use softer front springs and stiffer back spring
Tuning your machine is something that will come with practice. You need to learn the tendencies of each machine you use, and fully grasp the fundamentals. You will be able to develop your own techniques that you will carry with you through your entire career as a tattoo artist.
Rotary Tuning
Tuning a rotary machine is as easy as it gets. They are able to operate as both a liner and a shader, so really all you have to do is adjust the needle depth, by moving the tube stem up and down in the frame. For your liner, you want the needle to hang out about a dime’s length from the tip while not running, and a shader about a nickel’s width.
The motors rarely go out on a rotary, but if they do they are easy, and inexpensive, to replace. The only part that you can change to really customize a rotary is the cam—which is where you attach the loop end of the needle bar to the machine. The reason you would change out your cam is to adjust its throw. A rotary moves the needle by turning the cam in a clockwise spiral, so a longer cam would give you a longer stroke length while a shorter cam will give you a shorter stroke length.
Power Supply
The power supply is used to control the voltage your machine is running at. You can also use the voltage to speed up or slow down a machine, but generally, you want to use other means to do so. If you run your machine at a high voltage for a long period of time, you have the chance to overheat the machine.
There is no perfect voltage to run your tattoo machine at, but most will require between 4-12 volts. Every machine will be different, and how you have your machine tuned will play a big role in what volts you need to run a machine at. A good rule of thumb, though, is to turn the voltage up until you hear a constant uninterrupted buzz.
There are several parts that play a role in supplying power to your machine.
Power Supply Box
The tattoo power supply box will usually have dials or meters that help you control the volts. It will also be where you connect your machine and foot pedal to the source of electricity. They come in many different styles: some basic with just jacks to hook your equipment into and a dial and some more advanced with meters that will tell you all kinds of information.
Leads
There are going to be leads on both your machine and your power supply box. The leads on the machine are the two holes located on the rear of your machine. These holes in your machine are where the clip cord connects to your machine to transfer power from the power supply to the machine. On most machines the top lead is negative and the bottom is positive.
The leads on your power supply are where you plug in your machine and foot pedal. These are usually phone-jack plugs (like a guitar amp).
Clip Cord
The clip cord is what transfers power to your machine. On one end you have a phone-jack plug and the other end has a flat bendable end with a spring and two metal bars shaped in right angles.
To connect to your machine you place the right angled metal ends into the leads, and the spring will hold it in place. Make sure you connect the positive metal end into the positive lead and the negative metal end into the negative lead. They might be labeled black or – for negative and red or + for positive.
Foot pedal
Your foot pedal also connects to the power supply. You use your foot pedal to control when electricity is being fed from the power supply box to the tattoo machine.
Tattoo Ink

This day and age there are an unlimited number of choices when it comes to tattoo inks. Certain tattoo inks are great for one thing but terrible for another, so it’s important to play around with all different kinds of brands and styles of inks to find the ones you like best for specific jobs.
Making Your Ink Thinner
Some tattoo inks will be so thick that if you try and use it to do lines, you will have a high chance of blowing out lines. You also might need a thinner ink to achieve a specific shade of color or a softer gradient. Whatever the reason might be you can achieve a thinner tattoo ink by adding distilled water to the ink.
You’re going to want to do this in small ink caps usually, to cater to a specific need. You can do it to the entire bottle of ink if you plan on using it all in one specific way, but the best practice is to do it in ink caps.
This is a technique that is better learned through first-hand experience, and just getting to know how different inks react.
Making Your Ink Thicker
Some inks will be really thin, making it less than ideal for packing in color. You can use glycerin to thicken up an ink, or even mix it with an ink of a higher viscosity. Glycerin can be obtained from any pharmacy or tattoo supplies shop.
Making Grey Wash
Grey wash is a method used for shading tattoos. It utilizes varying shades of grey to achieve a specific contrast on a tattoo. There are a few different methods to making grey wash ink including mixing it with water, mixing black ink with white ink, and buying premade grey wash ink called Sumi ink.
The process of making grey wash is a technique you will want to refine on your own, but here is a very basic method to obtain a very basic setup for grey washing.
- Grab four to six ink caps and lay them all out in a line.
- In the first cap fill it up with nothing but your black ink.
- In the next three to four caps fill them with equal parts distilled water. Usually about half way filled will be good.
- The final cap is filled entirely with distilled water.
- In the first cap with water place one drop of black ink, in the second cap two drops of black ink, and the third cap three drops of black ink, etc..
You do this to achieve controlled varying shades of grey. The water cap at the end is used only to clean out the tip of your machine so you can maintain the level of dilution in the inks throughout the tattoo.
Over time, you will develop and refine a process for grey wash that will help you achieve consistent results.
Color Inks
You can obtain any shade of color by mixing various shades. It will be wise to familiarize yourself with color charts and how mixing colors work. Also, a good rule of thumb is that you should tattoo from darkest color to lightest color.
Red Ink
Red ink is generally regarded as the hardest color of ink to work with, especially when trying to pack color in. This is because while tattooing the skin gets irritated and turns red naturally, making it sometimes hard to differentiate between skin and pigment.
This causes ink to either fall out because it was not placed in deep enough to begin with, or a tattoo artist just missing a spot that looked liked it was tattooed when it was in fact not. Use extra caution and stick to sound fundamentals while tattooing with red ink.
Tattoo Needles

The needles are what is going to transfer the ink from the tube tip into the second layer of the skin (the dermis). Contrary to what a lot of people think, tattoo needles are actually made up of a group of needles attached to a needle bar.
Attaching needles to a needle bar will allow the tattoo artist to use a grouping of multiple needs to pack in a lot of color in one go or a smaller grouping to create fine lines.
There are tons of groupings made for tons of different jobs. When you are just starting out it’s smart to stick to what the manufacturers suggest using the needles for, but when you are more advanced you can utilize out of the box ideas to create all kinds of effects.
The Parts of a Tattoo Needle
The tattoo needle can be broken up into three parts:
- Grommet – which holds the needle bar in place on the armature bar nipple.
- Needle Grouping – needles of various shapes, sizes, and numbers soldered in place to the needle bar.
- Needle Bar – the long cylinder piece of metal that attaches the needle groupings to the armature bar nipple.
Buying Pre-sterilized/Pre-made Needle Groupings
A lot of tattoo artists will make their own needles by soldering needles to the needle bar themselves, but nowadays pre-made needles are easy and inexpensive to buy so it’s the preferred method of new artists.
All of the pre-made needles you can buy will be labeled with a specific universal code that will tell you exactly what the needle grouping should be used for.
The code is going to tell you the needle diameter, needle count, and how they are grouped together. So when you go to buy needles you will see the needle is called a 1207RS. So what the heck does that mean? Basically, what that code means is, this particular needle is a “#12 7-Round Shader”.
Makes a little more sense that way right? Here is the code is broken down for you:
- The first numbers (12) refers to the diameter of the needle.
- The next two numbers (07) refer to the number of needles.
- The letters (RS) refer to how the group is defined.
Diameters of Tattoo Needles
The reason the diameter of a tattoo needle is important is it affects the flow of the ink. The narrower the needle the finer the stream of ink that flows from the needle, and vice verse with wider needles. Because of this ink flow control, generally, narrower needles are used for outlining while wider needles are used for shading and coloring.
Common Needle Diameters
- #12 = 0.35mm – Most Common
- #10 = 0.30mm
- #8 = 0.25mm
- #6 = 0.22mm
How Needles are Defined
How the grouping is defined indicates how the needles are grouped and what they are best suited for. For instance, in the example above the “RS” stands for round shader meaning it is a needle grouping that is made for shading with. The most common way to look at tattoo needle groupings is: Rounds are usually for liners, Magnums for shading, and Flats for coloring.
Common Needle Groupings
- RL = Round Liner
- RLXT = Super Tight Round Liner
- RLXP = Extra Super Tight Round Liner
- RS = Round Shader
- F = Flat
- M1 = Magnum
- M2 = Magnum Stacked
- M1C = Magnum Curved
- *T = Textured
- No Code = Loose Needles
The Tattoo Stencil

Most of your clients aren’t going to want you to freehand a tattoo on them. They are going to want to see how the tattoo will look on them before they give you the go ahead, plus it just makes your job easier if you have a plan of attack. That is where tattoo stencils come into play.
Transfer Paper
The most common stencil material is thermal transfer paper. The paper comes in four layers that each serve a different purpose.
- The top layer is a thin white sheet, this is where the artwork will be transferred to.
- The second layer is not connected to all of the other layers and is a milky white. This layer is thrown away.
- The third layer is the a blue/purple sheet of carbon. By pressing on this layer the artwork is transferred to the top sheet.
- The bottom layer is a yellow sheet of paper that holds the original piece of artwork in place.
How to Apply a Stencil
You need to transfer the artwork to your transfer paper first, which can be quickly done with the use of a tattoo stencil printer. Now it’s time to get this stencil on the client’s body. There are several method to go about this. The old fashion and cheap way is to use unscented speed stick, but if not done properly this can be a cause of cross contamination. The new school way is to use some form of transfer liquid.
Steps to apply stencil with transfer liquid:
- Clean clients skin with green soap
- Shave the area where you are going to tattoo
- Clean area with green soap again
- Sterilize the area with an alcohol wipe
- Completely dry the area off
- Apply transfer liquid to the skin
- Firmly apply stencil for a few seconds (be careful not to move stencil while holding it in place or it will smudge)
- Let stencil dry on skin for at least 10 mins before beginning the tattoo
How to Use Speed Stick Without Cross Contaminating
A lot of people are just going to cheap out and go with speed stick because it’s not only the tried and true way it had been done for years, but it’s very cost effective. If you are going to elect to use Speed Stick use this method to help prevent cross contamination.
Steps to apply stencil with Speed Stick
- Clean clients skin with green soap
- Shave the area where you are going to tattoo
- Clean area with green soap again
- Sterilize the area with an alcohol wipe
- Completely dry area the off
- Grab some UNSCENTED Speed Stick *Do not apply the deodorant directly to the clients skin*
- Apply the deodorant to a clean paper towel
- Rub the area where the stencil is going with the speed stick on the paper towel *If you need more deodorant, throw out the used paper towel, grab a NEW clean paper towel, and start the process over again*
- Wipe off excess deodorant
- Firmly apply stencil for a few seconds (be careful not to move stencil while holding it in place or it will smudge)
- Let stencil dry on skin for at least 10 mins before beginning the tattoo
Now that the stencil is on the client’s skin we are ready to begin the tattoo!
How to Tattoo
How to Outline a Tattoo
I’m going to show you the basic principles of outlining tattoos, and a few traditional best practices. It’s up to you to hone these techniques through hard work and practice.
Outlining Basics
For starters, generally, the more needles that are in your grouping the more solid and smooth the lines will be. While fewer needles in a grouping will usually mean more pain for the client. This is because of the larger surface area that the larger grouping takes up requires more force to penetrate the skin.
The most basic way to set up a liner is to have the needle sticking out of the tip the width of a dime while the machine is not running. Since this is the most basic, this is the technique I will be basing the process on.
As an artist, you should know about line weights, and what role they play in a drawing. To achieve varying line weights on a tattoo, instead of switching out needle groupings for a larger line, you can tattoo two parallel lines and then fill them in with a third line.
When drawing lines that will connect you need to do the lines with two separate strokes in the same direction, and have them meet at a point. Lift the needle out just prior to the lines meet to avoid a blowout.
Blowouts are when the ink expands under the skin. They are caused by either the needle being too deep in the skin or because too much ink is placed in one particular area of the skin
When starting out it’s best to use liner specific needle grouping to outline tattoos, but as you gain experience travel outside the box, and develop techniques using all kinds of groupings for different effects.
It’s important to keep in mind while outlining that the skin can easily be damaged during the process. This is because the machine is so fast and hitting hard.
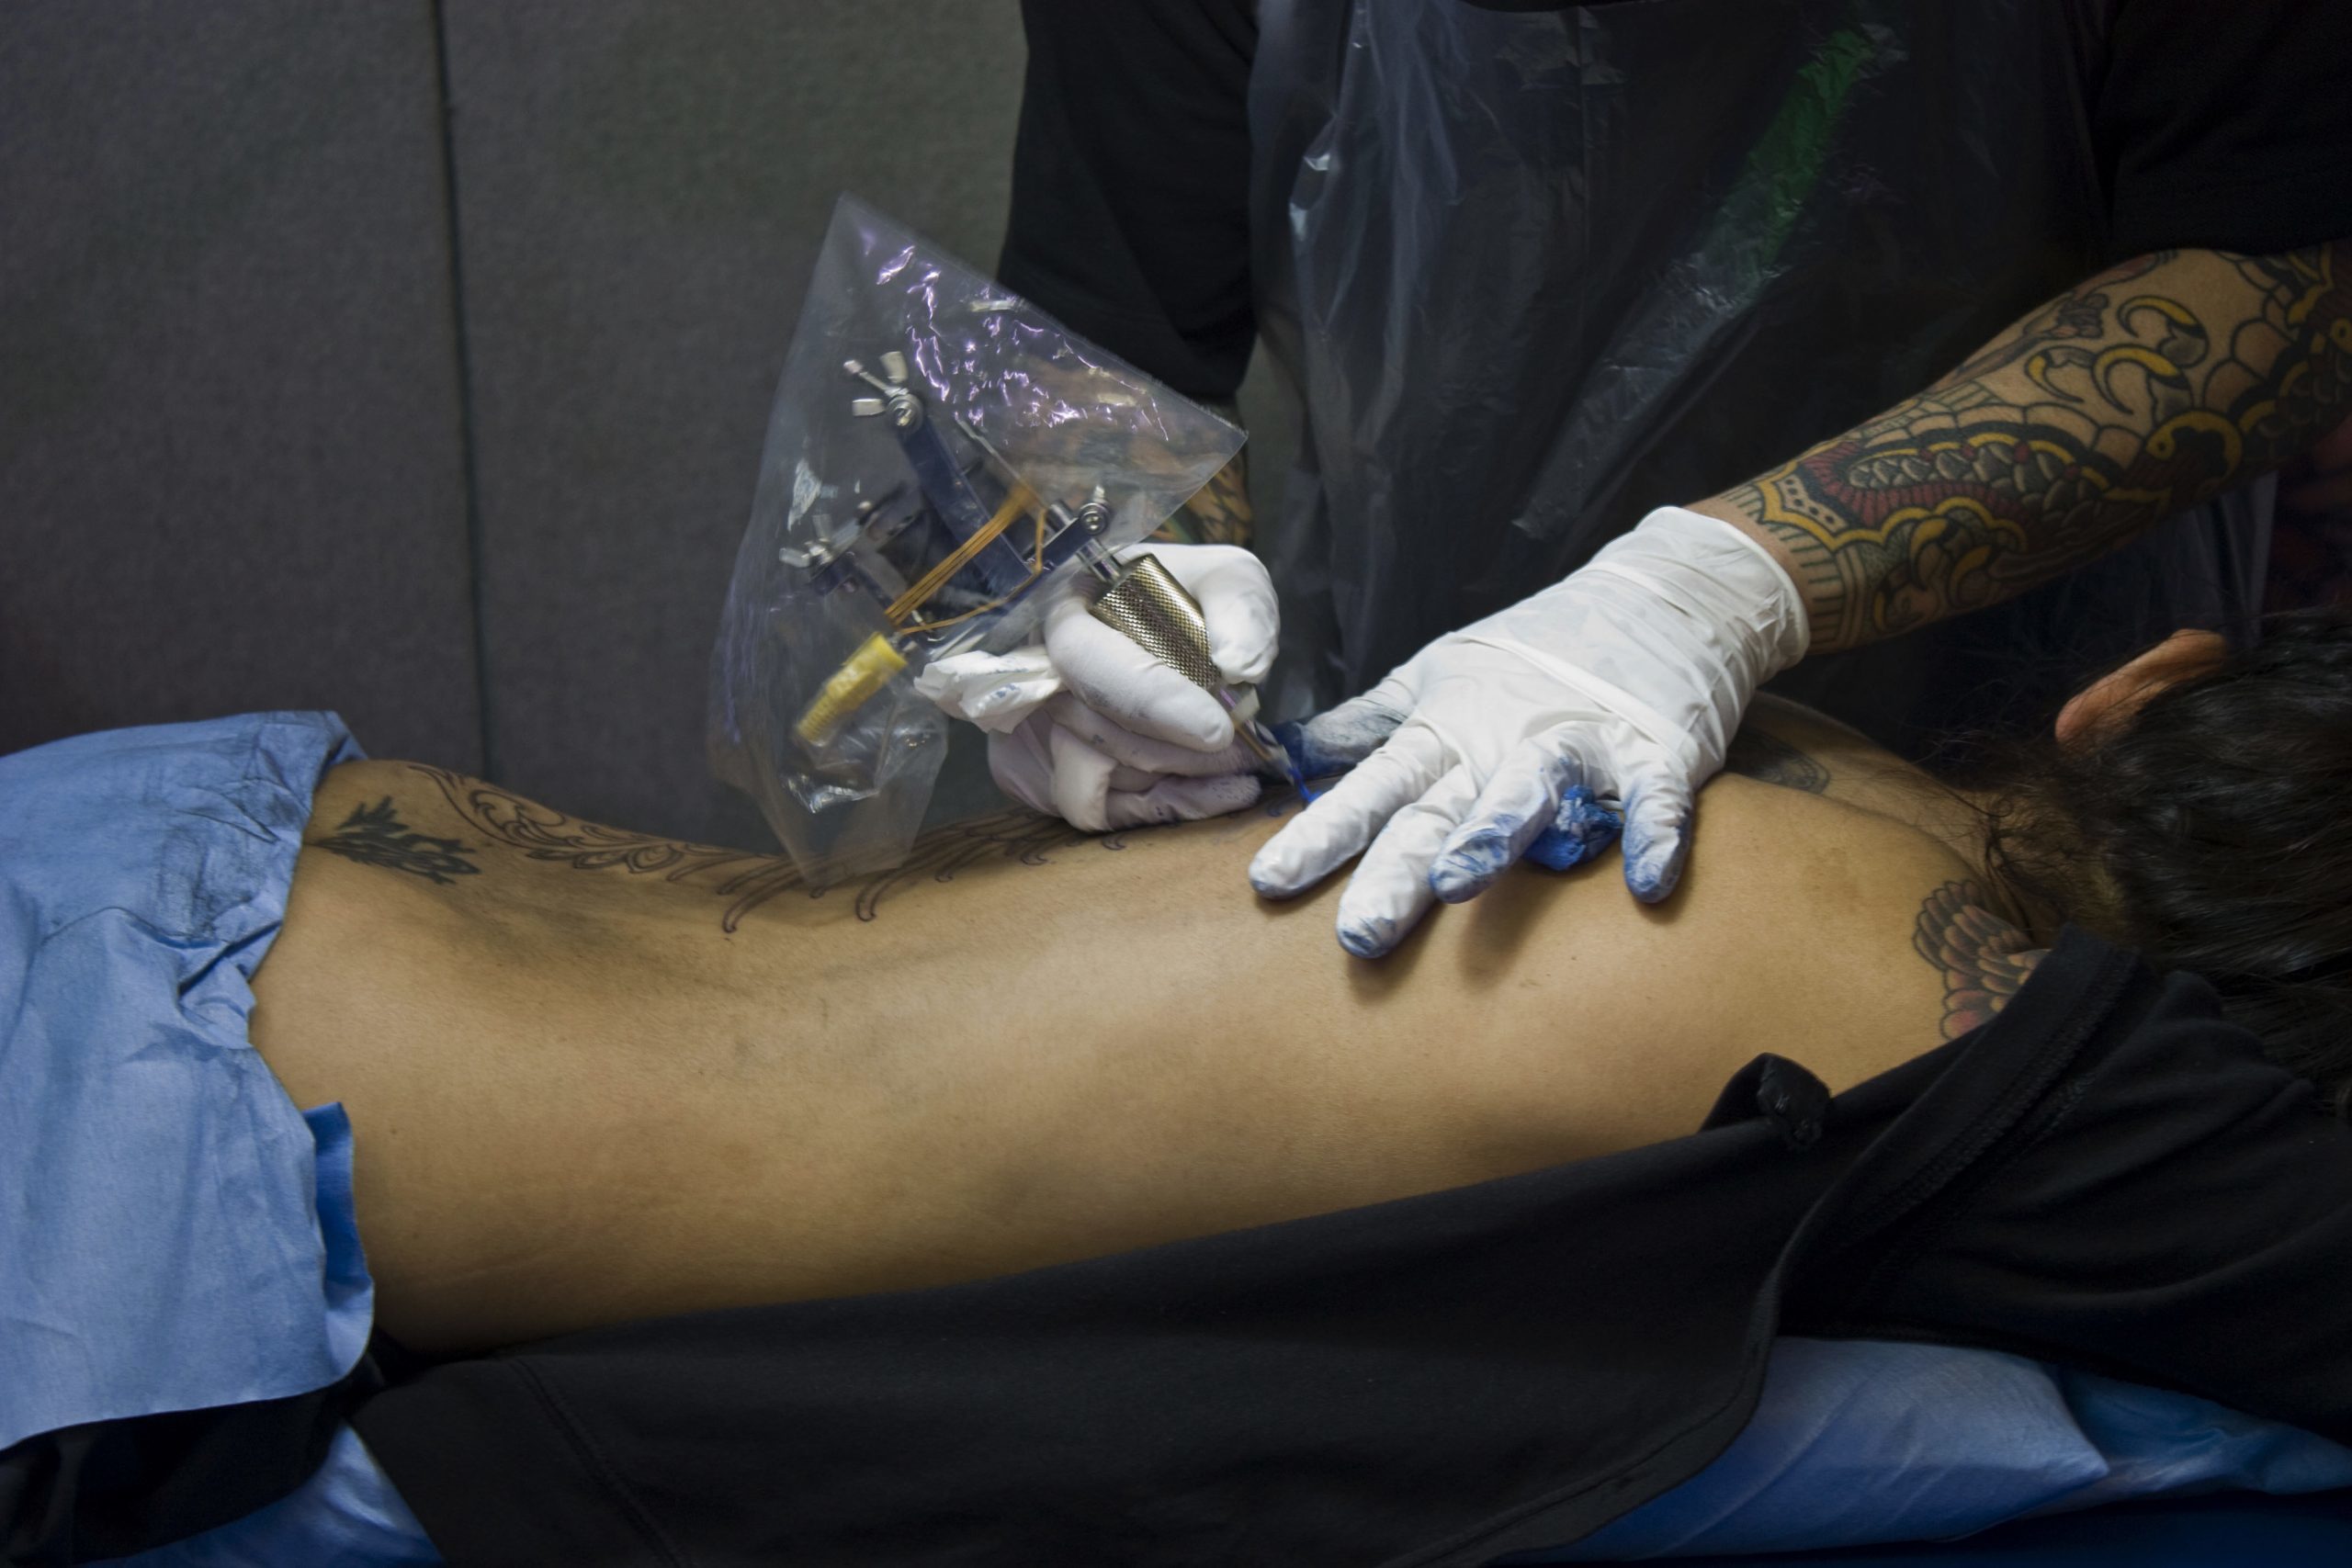
The Process of Outlining a Tattoo
- Sanitize your work area.
- Sanitize client – clean the client with green soap and alcohol.
- Apply the stencil to the body.
- Apply a VERY thin layer of petroleum jelly over the area you’re going to be working. You do this to relieve any friction caused by your glove rubbing on the skin and to catch any excess ink to prevent it from staining the skin.
- It doesn’t matter where you start the tattoo from just be consistent. If you start on the right then work from right to the left, but if you start from the left work from left to right. It’s all a matter of personal preference, just wherever you are most comfortable. Wherever you start just be aware to not wipe off the stencil. Left and right don’t matter, but you should always start from the bottom and work your way up, because the sweat, ink, blood, and plasma will all drip down.
- Now it’s time to fill the tube tip reservoir with ink. To fill the tip reservoir with ink, with the machine off, dip the tip of the tattoo machine in the ink cups you have laid out for the tattoo. Over time you’re going to learn how much ink a particular line will take with different tips. This will come with practice, a good practice when starting will be to dip the tip in the ink after every line.
- Now that your machine is filled with ink you need to stretch the area where you are going to do the line tight so that it is flat. You do this with your free hand. If you can not get the skin stretched as tight as you feel you need, have the client adjust their body to help you stretch the skin.
- Don’t hold the machine like a pencil. Instead, grip the tip with just your thumb and pointer finger. Then use your pointer, middle, and ring fingers as a steady platform pressed against the skin. Keep in mind, your wrist should not pivot. You use this form to achieve a constant angle and needle depth. It helps prevent uneven lines or blowouts caused by the needle depth fluctuating.
- Now power the machine by pressing your foot on the foot pedal.
- With the machine running insert the needle to the correct depth and guide the needle through the skin. You need to tattoo the line in one smooth stroke from the bottom of the line to the top of the line. You need to always tattoo either sideways or forward, and be sure you don’t go too deep. Keep in mind, you’re working off the tip of the needle, not the tip of the tube. You have to experiment and find that sweet spot through practice.
- Draw the lines slowly, but not to slow, and keep the pace consistent. If you go to fast the needle can outpace the ink, but if you go to slow you can damage the client’s skin or cause blowouts. The proper speed will be found through practice.
- After each line gently dab and excess ink off of the skin. You want to dab to minimize the risk of smudging the stencil.
How to Shade a Tattoo
Now that the outline of the tattoo is done, it’s time to give it depth by shading the tattoo. When I refer to shading I’m talking about using a gradient to achieve a 3-D like effect. There are several techniques you can use to shade a tattoo, and it’s where your skills as an artist will really shine through.
I am going to teach you a few basic shading techniques, but it is up to you to put in the work to practice and master them.
Shading Basics
The best practice is to do your outline and shading is separate sessions, but sometimes that’s not always how things can work out. If you have to shade and outline in the same session, it’s best to wait at least fifteen minutes after the outline is done, and clean the area really well with soap and water.
There is no correct needle configuration or speed to run a machine at for shading, but generally, artists run their machine softer and slower while shading. This is because you will be going over the same area on the skin multiple times to achieve various effects.
The general rule of thumb during shading is to have your needle sticking out a nickels width while the machine is not running.
Also, if you made a mistake while outlining shading is a good way to cover it up. So keep that in mind while you develop your shading plan.
Shading Techniques
Shading can be done several different ways, but the most common are to use circular motions with the machine at a 45° angle and control the ink with the pressure of your hand. What I mean by this is, you tattoo in circular motions to blend in different shades of the ink, and you control the shade of the ink by pressing the needle down less in the areas you want to be lighter.
Another technique would be to use a flicking wrist motion. What you do is apply more or less pressure at the beginning of the stroke and gradually release the pressure or increase the pressure throughout the stroke to achieve varying effects.
Something to be Aware of While Shading
When using grey wash to shade, you need to know that when the grey with only one drop of black ink is first put into the skin it is going to be difficult to see. This is because of the redness of the skin. You need to know this so that you don’t keep applying more ink thinking that it is not sticking and ending up with a darker shade than you had intended.
How to Color a Tattoo
When I talk about coloring a tattoo, I am talking about packing in a solid color. This technique is used for pieces like tribals and adding color to a coy fish. This should usually be the last step of the tattoo process.
When adding color to a tattoo, it’s always important to remember color theory: You should tattoo from darkest colors to lightest colors. This is to prevent dark colors from getting muddled with the lighter colors.
The most common technique for packing in color is to go in in circular motions while applying consistent pressure. Typically with the needle at around a 45°. You’re not trying to give any effect when coloring, just simply filling in areas with a consistent shade of color.
What to Remember about Tattooing Techniques
There are no proper ways to anything when it comes to tattooing, only established best practices. And these best practices are merely rules that were meant to ultimately be broken. These here are the basics of outlining, shading, and coloring a tattoo, but once you master the basics you should work towards developing new techniques that will help your tattoos stand out amongst the rest.
Bandaging The Customer

Now that you have finished the tattoo it’s time to sanitize your contaminated areas. This means you are going to clean up and seal what is now effectively an open wound on the client. It’s very important to remember that you keep all of your equipment separated until the customer (and your work area) is completely sanitized and bandaged properly.
Proper Way With The Proper Materials
The materials you need are going to be determined by the size and placement of the tattoo, but the supplies you will generally need are:
Supplies Needed
- Green Soap
- Paper Towels
- Surgical Tape
- Medical Bandages
Wait 5-10 minutes after the tattoo is finished and carefully blot off the blood and plasma from the tattoo. After you blot the blood away, wash the whole tattooed area with green soap. Take this time to see if you need to go over any spots you may have missed. Once the tattoo is clean, rub a very thin layer of A&D Ointment on the tattoo before bandaging it up.
For a larger tattoo, the best practice will be to fold paper towels to where they are double layered and place them over the tattoo and gently tape them with surgical tape.
The best practice, in general, is to use proper medical bandages, they come in all shapes and size so they can be used on most tattoos. This procedure is simple; most of them have adhesive sides so you just remove the back and place over the tattoo. You can then use surgical tape to better hold it in place if you feel it is necessary.
Tattoo Aftercare
After the tattoo is bandaged it is your job to inform your clients how to properly take care of the work you’ve done. Here is a good procedure for you to have your clients follow.
That’s the Basics of How to Tattoo
These are the basics of How to Tattoo, from how to sanitize all the way to tattoo techniques, but at the end of the day how great the tattoos you put out will depend on your level of dedication.
Always be learning, always be pushing your artistic limits, and trying out new techniques. If you want to be successful as a tattoo artists, you are going to have to master the fundamentals and develop unique styles and techniques off of them. If you love the art and the hard work, then nothing can stop you from achieving your dream of becoming a tattoo artist!