
Tattooing is all the rage nowadays – something that should not surprise anyone. The increased societal acceptance of tattoos in the last couple of decades and wide use in pop culture can be credited for reducing the taboo that’s been attached to tattoos.
The ascendency of tattoos has been coming for some time now. There are many reasons behind this. It would be impossible to find anyone who either has not gotten a tattoo themselves or at the very least knows someone that does.
But while getting a tattoo inked on the body is an exciting way for one to express themselves to the broader world, it can be pretty expensive. This naturally can turn many people off. But what if there is a way one can get the cost down. Well, there is a way to do just that, by producing high-quality tattoo ink at home.
Yes, it is possible to make tattoo ink using household items like paper and glycerin. It is overall a straightforward process. So, if you are wondering how to make tattoo ink using household items, we will help you out.
However, before we start, it is vital that you understand how dangerous unhygienic tattoo ink can be. It could cause severe infections, resulting in even hospitalization in many cases. So, it is crucial that you do not use any recipe you find on the internet without doing any proper research.
Methods For Making A Homemade Tattoo Ink

Finally, here are some popular and easy methods of making homemade tattoo inks. Scroll down to read how you could get your own tattoo ink with readily available materials at home and the simple processes involved.
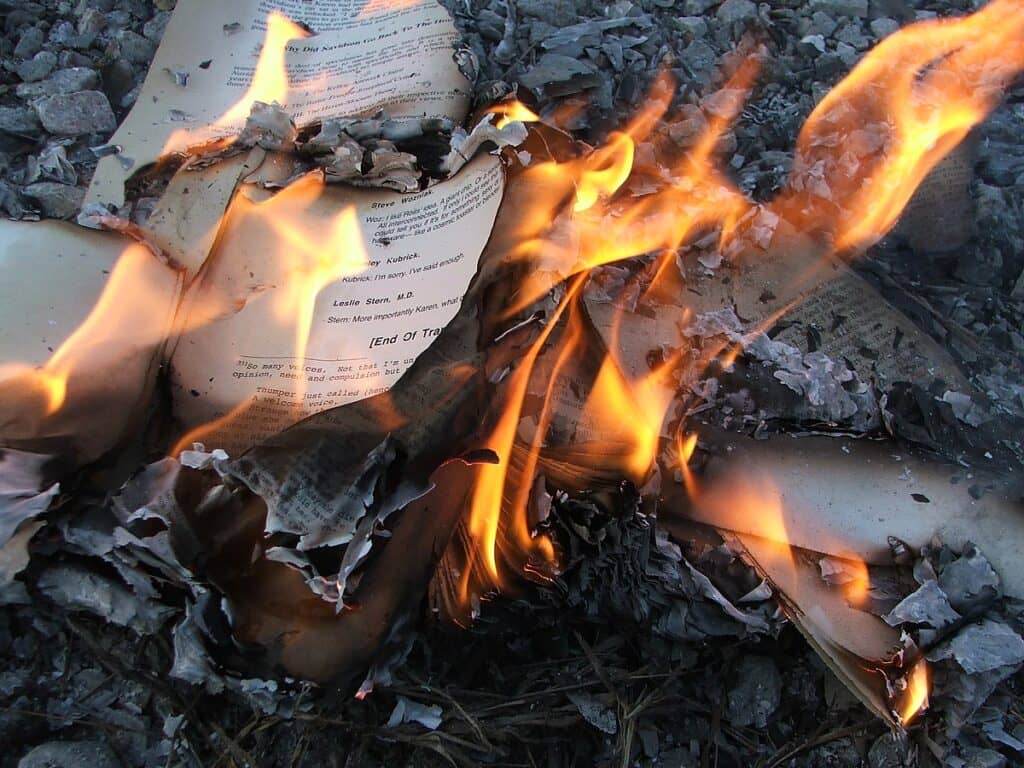
Method 1. The Simple Paper Ash Method
The very first method that we will cover is the Paper Ash Method. A straightforward method that does not require one to follow too many tricky steps – which is also a reason why it is so popular.
Ingredients required for this method:
- Lighter
- Plate
- Paper
- Water
- And lastly, a Bottle.
Step 1. Burn the Paper

In the first step, you are required to take a few sheets of paper and burn them using the lighter. But before you light up the sheets, take the plate and clean it thoroughly. The ashes of the burned paper have to be collected on the plate, so you have to be confident that the plate is cleaned correctly. If that is not the case, it will affect the final results.
In addition to being one hundred sure about the plate’s cleanliness, you also have to be careful in your paper collection. Do not try to burn more than a couple of sheets in one go. Your target is to get an adequate amount of burned paper on the plate.
So, burning more than a couple in one shot is not helpful. You also have to be careful while using the lighter as you do not want to harm yourself accidentally.
Step 2. Collect the Ashes in a Bottle And Add Water to it
Once you have collected sufficient burned paper on the plate, you must pour the ashes into the empty bottle. Shake them for a while after doing so. It is to be done until the ashes have turned into a fine powdery form. Once that is complete, you need to fill the bottle with water.
It would help if you were extremely careful about how much water you add to the bottle here. In case you want dense ink, you should not add too much water. It is the amount of water that decides the density of the tattoo ink. So, be extremely careful while pouring water into the bottle. Otherwise, you have to redo the process.
That’s it. You have a tattoo ink that you can use as you see fit. This is a simple two-step process to create tattoo ink. So, it is no brainer why this is so popular among tattoo enthusiasts.
Also Read:- How to Make a Tattoo Stencil at Home?
Method 2: The Reliable Wood Ash Method

Next on the line is a highly reliable Wood Ash Method that has survived the test of time and is another of the more popular homemade tattoo ink methods. Unlike the Simple Ash Paper method, it is not a two-step process. A few more processes are involved, making it a bit more complicated. With the guaranteed satisfactory result, your efforts would be worth it. But you do have the follow the steps listed below to the letter.
Ingredients required for this method:
- Wood, obviously,
- Vodka,
- Gasoline,
- Blender,
- Vacuum Cleaner, and
- Grinder
Step 1. Everyone’s Favorite Part, Burning the Wood

What could be more satisfying than burning a couple of wood logs, especially during those chilly winter nights? However, you are doing the same for a specific purpose, creating a homemade ink. The wood must be thoroughly burned for the final result to be optimal. And for that, it would be best if you opt for Softwood. The reason? They are straightforward to ignite. You are not even required to use gasoline to burn the Softwood, although it would certainly accelerate the process.
If Softwood is unavailable for any reason, the next option would be Hardwood. To ignite Hardwood, you would be required to pour a bit of gasoline on top of it. Otherwise, the wood would not burn, or at least quickly enough.
Regardless of the wood you use, there is one thing you need to make sure of, letting the wood burn to the crisp. Also, it would help if the process was done on a clean surface.
The finest ink only appears when the wood is turned into carbon black ashes. There should not be any other color present in the ash once the fire goes out. It is pretty essential that it should be the case. It would be best to be careful while picking up the ashes, as it would be pretty hot. Let it cool down, and then collect the ashes after a couple of minutes.
Step 2. Collecting The Ash From the Burned Wood

We have already alluded to this step in the earlier point. The next step in this process is to collect the ash from the burned wood. Now, it may seem a simple enough task, but it can get tricky if one does not follow the proper procedure.
Once the wood is burned completely, you need to collect the ashes, and for that, you should use a vacuum cleaner. The vacuum cleaner would allow you to heap the ashes without any difficulty.
Also, ensure that the vacuum cleaner is spotless. You surely would not want any impurity to get mixed in. If there are any burnt chunks of wood leftover, use a hammer, grind them to dust, and then use the vacuum cleaner.
Step 3. Grinding the Ashes

The next step is to grind the collected ashes completely. This is a crucial part of the process and would require perfect execution; otherwise, you would not get the result you are expecting.
The wood ashes must be ground to the finest form to get the desired ink quality. And this is done by placing them in bottles and shaking them until the deed is done. It would at most take 1 minute.
However, you can also use an electric grinder for the same process. It does seem a more straightforward process, but you must make sure that the container is utterly dirt-free before use.
Step 4. Choose a Clean Spirit For the Mix
This step might seem a bit weird, especially after covering the Paper Ash Method. But here you are to mix the ashes with a clean spirit. Water is not recommended in the process. The Reason? Because it could harm the wood, and since the whole process is heavily reliant on wood, it is simply not an intelligent thing to do. Wood is more susceptible to microorganisms than paper, so water is simply a no-go here.
The reason why an alcoholic agent is recommended agent is that they have disinfectant properties. This property allows them to kill any harmful microorganisms. And in case you are worried about the alcoholic agent impacting the color of the ash, don’t, as that does not happen. Your burned wood is completely safe with an alcoholic agent. Something to note here is that you can use any alcohol you like without any issue. Vodka or Gin both will do well here.
Step 5. Lastly, mix the Ashes With the Spirit
You got to have seen this one coming. The last step of the process is to mix the burned and the processed ashes with the chosen spirit. Although, you need to be extra careful how you do this. The correct way to do it is by pouring the ashes and spirit into a blender and simply letting it do the work for about 15 to 20 minutes. The final result should be somewhere between a paste and liquid without any wood fragments. And voila, you have your homemade ink ready for use.
Method 3: The Dry Ink Pigment Method

Lastly, we have the Dry Ink Pigment Method. But since we have placed this last on the list, do not be under the impression that it is lesser than the methods mentioned above. An argument can be made that this method is far superior to the others and possibly safer as it does not require any burning. But again, this is subjective to individuals. No matter which method you opt for, you will get satisfactory results.
Ingredients required for this method:
- Pigment Powder,
- Glycerin,
- Propylene Glycol,
- Witch Hazel, and
- Blender
Step 1. Get the Pigment Powder
You first need to decide on the color you want your tattoo ink to be. This is unique in this process compared to the others on the list, as you can get different colored ink for use. Once you have decided on the tattoo colors, you must purchase pigment powders for them.
Now, this is where you have to be extremely careful. Many different pigments are available in the market, and most of them are good enough for this method. But what you need is a pigment powder that is skin-friendly in nature. Any other would be a disaster, especially if you opt for pigment used for car painting. It is something that you would not want to experience.
Step 2. Blending the Base Materials
The next step of this process is blending the base materials in the blender. These materials are Glycerin, Witch Hazel, and Propylene Glycol. Add 32 ounces of Witch Hazel, 0.38 ounces of Propylene Glycol, and the same quantity of glycerin. It is crucial to be accurate with the measurement here, as this way, you will get the best color out of the pigment.
Avoid using alcohol and water during any part of the process. Alcohol and water help bring the color out of the material. Still, it only works if the intended color is black. They do not work for other color options.
Step 3. Now Add the Color
Once you have the liquid base ready, the next thing to do is add the appropriate pigment to the combination. You can also choose the brightness of the color. The brighter the color ink you want, the more pigment powder you have to add. The same is the case with a softer hue as well. Add a small amount of pigment to the mix and keep adding until you are satisfied. This would also allow the pigment to mix well with the liquid paint.
Step 4. Use a Blender
The last step of this process is to mix this resulting liquid into a blender and let the machine do the job. Keep the blender at its slowest speed setting to get the perfect results. You can also add more liquid to the mixture if you require the ink to thin out a bit more. And if you want to make it a bit thicker, add more pigment. It is as simple as that.
Once you are satisfied with the density, change the setting to medium speed and leave the machine running for at least an hour. At the end of the hour, you would have your desired color ink ready to be used. Repeat the process for different colored inks.
Risk of Using Homemade Tattoo Inks

While homemade tattoo ink making is a straightforward and inexpensive process, there are risks attached to using them that one should be made aware of. Professional tattoo artists recommend using homemade tattoo inks only on pigskins, fruit, or silicone skin. Using it on humans, especially ones with health issues, is not advised.
You could invite yourself to some severe consequences by using homemade tattoo inks.
1. Infection
It really would not have surprised anyone. Infection is a constant risk when one opts to get a tattoo inked on their body. So, why is this on the list? The reason is that getting a tattoo infection is significantly higher in homemade inks than in the ones used at tattoo parlors worldwide. The commercially used tattoo inks are made carefully and under sterile conditions. This is something that is not possible in home conditions.
Your home condition could invite bacteria that could infect the tattoo ink. And what is worse is that it is something you can never be sure about. So, this is one of the primary reasons why using homemade tattoo ink is not advised.
2. Early Facing And Discoloration of The Tattoo

While the above steps seem simple enough that anyone with even a basic understanding of things would be able to follow, that does not mean that they are assured of the perfect quality of the finished ink. It is pretty standard for homemade inks to show signs of early fading and discoloration of the tattoo. These inks are made in an unstable environment with no quality control.
So, while the tattoo would look good for some time, there is no guaranteeing how long it will last.
3. Allergic Reaction
There is also a possibility of one experiencing some allergic reaction because of the homemade tattoo ink. The tattoo inks made in factories are usually allergen-free, or at the very least, they have very few allergens. The same is not the case with homemade ink. You could get a severe allergic reaction to the homemade tattoo ink.
Other Differences Between Homemade Tattoo Ink And a Commercial One

There are some other differences between commercial and homemade inks, and you should be aware of them. Let’s have a look:
1. Composition
The most significant difference between homemade tattoo ink and one made in factories is their composition. Factory-made tattoo inks are made using set ingredients up and down the chain. That is something true for all brands in the market. While their compositions might differ slightly, the ingredients largely remain the same.
There is uniformity in the products, but that cannot be said about the homemade tattoo ink. There are many different ways one can make homemade tattoo ink, which is certainly a vast difference between these types of inks.
2. Variety
There are limited ways to get different shades of color with homemade tattoo ink. The Pigment method does the job, but it also has its limitation. It is not a problem that commercially made tattoo inks have to face.
3. Expiration
A stark difference between these inks is how long one can store them. Most commercially available tattoo inks can be easily stored for two to five years, but only if they are sealed and kept in a cool and dark place. In contrast, homemade tattoo ink should be used immediately after making it.
Conclusion
Homemade tattoo inks certainly give an option to folks to choose an inexpensive method. And the process of making them is pretty straightforward as well. But there are certain drawbacks that you need to keep in mind while making your decision.

 By
By


